Course Options
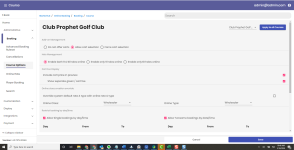
On this screen, you set up options for the course, such as cart rental, hole management, and booking restrictions. Each of the options is set per course.
-
Navigate to Course Options by starting in Online Options’ Hamburger menu | Booking | Course Options. The Course Options screen displays.
-
To select the course for which these options will apply, use the drop-down field in the top-right corner of the screen, and select the desired course.
Note: Select the Apply to all Courses button next to that drop-down field if you want these course options to apply to all your courses. The courses are created on your local terminal in your POSExpress.
-
In the Add-On Management section, select one of the following radio buttons for how you control how carts are handled per course:
-
Do not offer carts - Turn off cart selection.
-
Allow cart selection - Allows carts to be selected.
-
Force cart select - Forces a cart selection during checkout.
-
In the far-right of the screen, from the Cart type offered drop-down, select the type of cart you are offering: Full or Half.
-
In the Hole Management section, select one of the following radio buttons:
-
Enable both 9 & 18 holes online - to allow both 9 & 18 holes per course.
-
Enable only 9 holes online - to allow only 9 holes to be booked online.
-
Enable only 18 holes online - to allow only 18 holes to be booked online.
-
In the Cart Fee Display section, select the following checkboxes based on your needs:
-
Include cart price in preview - to display the cart price as cart price included on the tee time cell when checked; thus, combining the green and cart fees to one price.
-
Show separate green/cart fee - to display the cart price separated to its own line item on the tee time cell.
-
In the Crossover Display drop-down field to the right, select Display Crossover if you want to show the crossover in your tee sheet or Hide Crossover if you do not want to show the crossover.
This option controls how a crossover looks to your customer as follows:
-
Display crossover - If you set this, and when this course is the front 9 of a crossover, the site will display the back 9/crossover course. For example, the front 9 course is Red Course and the back 9 course is Blue Course. The course name for an 18-hole crossover will be displayed as Red Course/Blue Course.
-
Hide crossover - If you set this, and when this course is the front 9 of a crossover, the site HIDEs the back 9/crossover course. For example, the front 9 course is Red Course and the back 9 course is Blue Course. The course name for an 18-hole crossover will be displayed at Red Course. All aspects of the booking are the same, except that the back 9-course name is hidden from your customer. This is intended for courses that only offer 18-hole crossover tee times and do not want to show two courses online.
-
The Pairing Settings drop-down - controls how pairs book online.
-
Select Allow Pairing, and the bottom options display to enable you to set what singles and twosomes can book with:
-
Check the zero (0) checkbox - by themselves
Check 1-5 checkboxes - with existing golfers' bookings on a tee time.
-
Select Force Pairing from the drop-down to only allow singles/doubles to book with existing reservations set.
-
Select Disable Pairing from the drop-down so that singles/doubles cannot book with existing reservations.
-
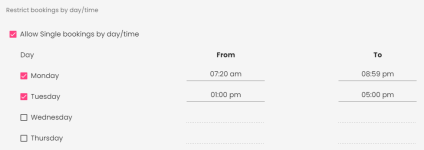
In the Restrict booking by day/time section, you can configure the behavior of singles, doubles, and threesomes booking by day and time.
For example
-
After you check either or both of the checkboxes, select the Day checkboxes for the desired days.
-
Next to the day(s) that you checked, enter in the From and To fields, the time range by doing the following:
-
Click the field. A clock displays.
-
Select the hour by clicking it from the face of the clock. The minutes are highlighted.
-
Select the minutes of the hour by clicking it from the face of the clock.
-
Click OK when you are done selecting your time.
-
-
Repeat this for each day of the week and repeat for both Singles and Twosomes if applicable.
-
In the Online tee time fee section, check the Hide tee time price checkbox to hide the tee time price when booking.
-
In the Delay tee time availability after online cancellation section, select the Allow cancelled teed times to be re-booked online checkbox and then enter the about of time in minutes in the field next to it - if you would like to delay the visibility of the tee time to your customers after they have cancelled so that they cannot immediately book the same time for a better price.

-
Select the Save button in the lower right corner of the screen


